
 Menu
Menu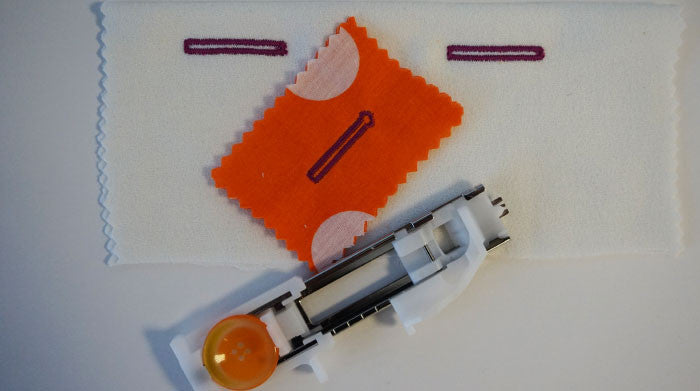
In this post we'll show how easy it is to make buttonholes with your machine and we'll take a look at some lesser known methods. We'll also show you how to avoid the pitfalls that are sometimes encountered.
If you're experienced with making buttonholes, then you may be familiar with what we're saying here, but even so, you may find our "trouble shooting" feature well worth reading.
Nearly all machines nowadays have a built-in buttonhole facility. Basic models usually have a four step system. As you move higher up the range you'll find machines featuring a one-step - auto size buttonhole.
Very basic machines such as those that only produce a straight and zigzag stitch can also produce buttonholes; sometimes referred to as Manual Buttonhole.
When buying a new machine, some customers tell us that making buttonholes is something they tend to avoid and that this tendency originally came about due to a bad experience in the past, or they just found the process too complicated.
So if you're new to buttonholes, or never had much success, then with a little practice and some help from our blog feature, we'll soon have you buttonholing to perfection… Read on.
Preparation
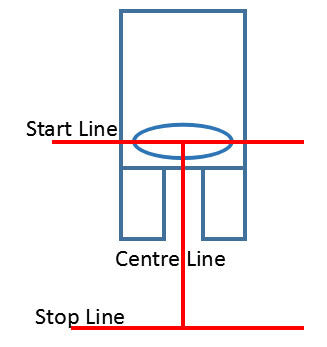
Marking out the buttonhole length
It's important to get the buttonhole length correctly marked out.
Too short and the button will not pass through the buttonhole freely; which over time, may cause damage. Too long and the garment may look poorly constructed.
For a general guide, the length needs to be a few millimetres longer than the diameter of the button that you are sewing onto the garment.
But this may depend on the garment, fabric and style of button.
There's no hard and fast rule on this; but as a general example: if the diameter of the button is 10mm and the thickness of the button is 2mm; you'll need the buttonhole length to be around 14mm, which we arrive at by adding twice the button thickness (in this case 4mm) to the button diameter (10mm) i.e. 2 + 2 + 10 = 14.
Of course, if your machine has the one step, auto size system, the above won't be so important, because the size (including the extra few mil added on) is automatically chosen for you.
However, situations will arise where the buttonhole needs to be longer than the length automatically programmed. We'll talk about this further down the blog post.
Methods for marking the length.
There are numerous ways of marking the buttonhole length onto the fabric.
A quick and simple way is to use a vanishing marker pen and a button from the garment.
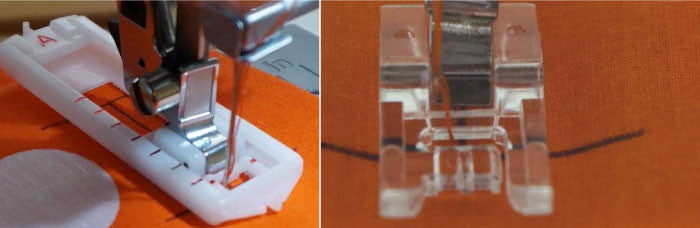
Place your button onto the fabric where you intend the buttonhole to be sewn, checking that it's correctly positioned in relation to the garment or where indicated by the sewing pattern. Now mark a dot at each end of the button - remember to add on the extra for the button thickness.
Next mark a straight line connecting the two dots, making sure it runs perfectly parallel to the garment edge, or right angle to the edge as on jackets, coats, etc.
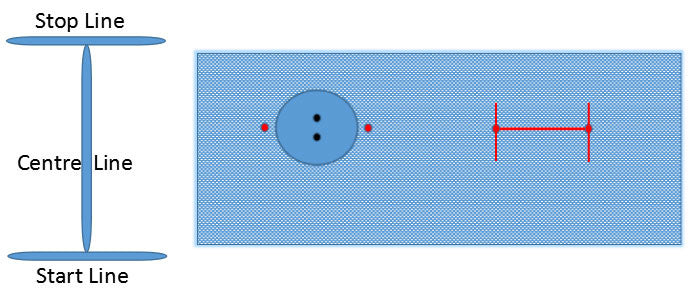
Finally,mark two lines at each end - in the same way as you'd cross the letter I as shown left above.
The line at the bottom is your starting point and the line at the top is the stopping point. However on some machines this will be the opposite way around, so check your user manual.
Stabilise the fabric
Most lightweight fabrics will need an interfacing between fabric layers; check the recommendations on the sewing pattern.
On translucent fabrics such as organza, it may not be possible to use an interfacing as it will show through. You can get round this by placing interfacing or a small piece of the same fabric to the underneath and then trimming away the surplus after completing the buttonholes.
Four Step Buttonhole
(you can skip this paragraph if your machine has the one step buttonhole)
As the title suggests, machines with this system produce buttonholes that are made in four stages.
Before starting, check your machine's user guide to see which presser foot to attach - usually supplied as standard.
Then read up on the recommended settings.
In our example, we're using a basic brother machine.
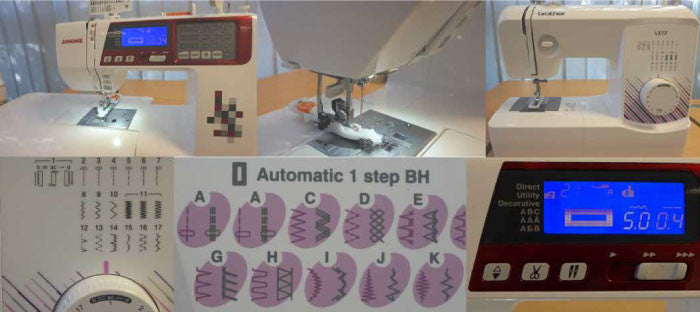
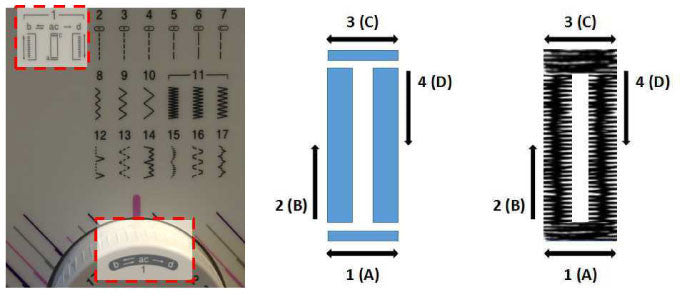
The settings on the selector dial on machines with a four step buttonhole will look similar to those in the picture (left) below.
Each stage being represented as either 1,2,3,4 or A,B,C,D
If your machine has a stitch length dial, you'll need to set this to around 0.5
Also, if your machine has a stitch width dial, this will need to be set to around 4 or 5 - check your user manual.
Tip: slightly reducing the upper tension will produce a neater buttonhole - set the tension dial to about 4 or 3.
Let's begin by attaching the buttonhole foot and then positioning the fabric under the foot.
Your machine will be supplied with either a clear view foot or sliding foot as shown below
Check that the centre line is in the centre of the presser foot and that the start line is directly below the needle.
You are now ready to sew.
Turn the selector dial to 1 ( or A) and sew about five stitches then stop. You have now made the first bar tack.
Next, turn the selector dial to 2 (or B) now begin sewing; maintaining a steady speed and the fabric will feed towards you. As you sew this stage, check that the centre line remains in the centre of the foot.
Keep sewing until you reach the stop line then stop sewing. You've now sewn the first side of the buttonhole.
Next turn the selector dial to 3 (or C) and sew about 5 stitches, then stop. You have now sewn the second bartack.
Next, turn the selector dial to 4 (or D) Now, start sewing; maintaining a steady speed and the fabric will feed away from you. Here again, it's important that the centre line remains central in the foot. Keep sewing until you you reach the start line and then stop.
And there we have it! buttonhole completed.
Just one more thing before you remove the fabric. It's a good idea to tie off with a few straight stitches.
To achieve this: turn your selector dial to straight stitch and sew about 5 stitches.
One-Step Auto Size Buttonhole
Machines with this system produce the buttonhole in one, nonstop operation and they're easier to operate than their four step counterpart.
There are a few exceptions, but most one-step machines have a special foot that measures the button being used on the garment. The buttonhole is then automatically sewn to match the size of the button.
Nearly all one-step machines are computerised / digital and offer a choice of styles such as keyhole or rounded end, as well as the regular buttonhole. However, there are a few machines which are mechanical and produce regular style only.
Preparing your Machine.
We'll start with computerised / digital
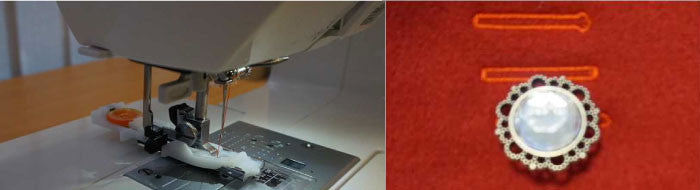
Take hold of the special one-step buttonhole foot and open up the two lugs located at the rear of the foot. Next take a button and place it into the receptacle.
Now squeeze the two lugs so that button is securely gripped. You can now attach the foot.
Next, we'll place the fabric under the foot making sure the starting line on the fabric meets up with the starting line on the foot (or is directly below the needle). Also make sure that the centre line on the fabric sits centrally within the foot.
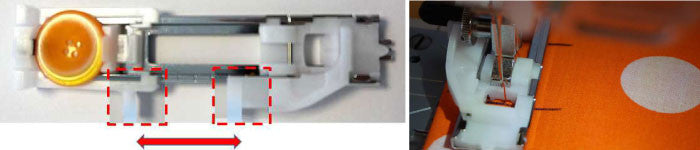
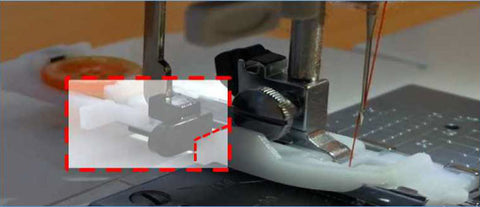
Take hold of the buttonhole lever that's located at the side of the machine and pull down until you feel it stop. Check that the lever sits between the two lugs on the foot (see picture)
Now let's select the style of buttonhole. We'll go for a standard one in this example.
The great thing here is that all the settings such as stitch length and width are chosen for you.
Start sewing and keep sewing until the machine automatically stops after completing the buttonhole. On examination, if you feel the stitch density is a little too open; just decrease the stitch length by 1 point. (press the minus key once) or if too close increase the stitch length by 1 point (press the plus key once).
Mechanical One-Step
Refer to "preparing your machine" above for details on attaching the buttonhole foot, fabric alignment, etc.
Turn the stitch selector to buttonhole and set the stitch length to 0.5. If your machine has a stitch width dial, you'll need to set this to around 5.
Now start sewing, maintaining a reasonably steady speed as the buttonhole is being sewn. Stop sewing when the second side of the buttonhole is completed.
To tie off and secure the threads: select straight stitch and sew a few stitches. You can now turn the selector to buttonhole ready for the next one.
On examination, if you feel the stitch density is a little too open; just decrease the stitch length very slightly, or if too close increase the stitch length very slightly.
Trouble Shooting
4 Step problem
"Fabric fails to feed when sewing stages 2 (A) and/or 4 (D)"
This is caused by sewing too many bartack stitches.
Too many stitches and the bartack will jam in the foot or needle plate slot, restricting the fabric from feeding as the sides of the buttonhole are sewn.
To avoid this problem, never sew more than five bartack stitches.
4 Step problem
"The stitch density on one side of the buttonhole is much closer than the stitching on the opposite side"
Buttonholes produced with a 4-step system do have a very slightly more open / closer density on one side.
This is because one side of the buttonhole is sewn with the feed working in reverse which has a little less grip on the fabric.
Check the stitch length is set to around 0.5. Sew a test buttonhole and if there is a very noticeable difference, try increasing or decreasing the setting very slightly until you see an improvement.
Some machines have a little adjustment wheel usually on the side near the power socket or just below the bed - refer to the user manual.
General problem
"When making buttonholes on synthetic stretch fabric, the stitching has large gaps. It's as though the stitching misses or skips every so often"
Very stretchy, tightly knitted fabrics such as Spandex, stretch polyester, etc require a Stretch Needle. In almost all cases, using a stretch needle, whether your sewing ordinary seams, or making buttonholes, will prevent skip stitching on these fabric types.
Don't confuse Stretch Needles with Ball Point needles. Ball Point are for sewing natural jersey fabrics, or synthetic jerseys that are not so tightly knitted.
Refer to our machine needle feature for more info
General problem
"Irregular stitching on sides of buttonhole"
This is generally caused by having the stitch length set too near to to zero.
To avoid this problem, always sew a test buttonhole on a piece of fabric from the garment. Remember to include any interfacing that's recommended on the sewing pattern.
On your test piece; start off with the stitch length set to 0.5 (approx halfway between 0 and 1 on mechanical machines) On most machines, this will produce a buttonhole with a reasonably acceptable stitch density. However, if the density appears a little too open, you only need to nudge the stitch length setting (very slightly) towards zero.
Alternatively, if too close, increase the stitch length (very slightly) until the correct stitch density is achieved.
It's also worth pointing out here that heavy garments - jackets, coats, etc will create a similar problem to those mentioned above. This is due to the weight of the garment pulling back and restricting the fabric from feeding. You can prevent this by taking up the weight and supporting the garment in your lap during the buttonhole process.
General problem
"On delicate fabrics, the stitches bunch up"
This is usually down to the stitch density being too close and / or the tension set too high. Try increasing the stitch length setting - just a little and set the thread tension to around 3.
Incorrect needle for the fabric you are sewing will cause problems, too. Most lightweight fabrics will require either a size 70 or 60.
Refer to our needle feature for more info.
Also, this problem will occur if the fabric hasn't been stabilised with interfacing between the the layers. If you can't use an interfacing; place a small piece of fabric or interfacing to the underneath. This can be trimmed away after the buttonhole is completed.
In addition, if your machine has a stitch width dial, you'll find that reducing the width setting to 3.5 will make a neater job.
On some sheer fabrics, a buttonhole reinforced with a fine cord will also help - we'll cover this further down the blog post.
General problem
"The bobbin thread is pulling through on to the top of the fabric making the stitching unsightly"
This is usually caused by the upper tension being set too high, so try reducing slightly - usually setting to around 4 or 3 will do the trick. Obviously, check that your machine is correctly threaded as well, taking care that the bobbin is fully threaded into the bobbin case............this one is a very common user error!
General problem
"On delicate, sheer fabrics the stitching tears away during or shortly after sewing"
Too heavy a needle for the type of fabric you're sewing, or a blunt needle will cause this problem.
A blunt needle will puncture the fibres of the fabric leaving nothing to support the stitching - it just falls a way.
Exactly the same applies if the needle is too thick.
Lightweight woven fabrics require a fine needle: size 70 or 60 either universal/standard point or Microtex point.
Refer to our needle section for more info.
One Step Problem
"The machine sews the bartack only, or bartack and the first side of the buttonhole, then stops; failing to complete the buttonhole process"
This is because the buttonhole lever hasn't been lowered, or not fully lowered.
Or even though you've fully lowered the lever, you've failed to make sure it's sitting between the two lugs on the foot - see picture above.
The same problem will occur if you haven't placed the button into the foot correctly. Make sure the button sits inside the receptacle (not outside) and is securely gripped.
You'll find it far easier to do this if you place the button into the foot before attaching it to the machine.
One-Step problem
"When buttonholing on a jacket or coat at right angles to the fabric edge, the fabric stops feeding after a few stitches"
Okay, so you know you have the stitch length correctly set and everything else setting wise is spot on. So why is this happening?
This is due to the extra bulk at the edge of the garment causing the foot to tilt and then press down into the fabric; subsequently preventing it from feeding.
The best way around this obstacle is to make a thickness compensating piece to level off the foot. You can achieve this by folding a few layers of fabric and carefully positioning this under the foot at the rear or front.
One-Step problem
"The buttons I'm using on the garment are too large for the One-Step foot"
This is the only limitation with the 1-step system. There are two ways you can get round this.
1: Make the buttonholes manually - refer to Manual (turn round) buttonhole below.
2: Some computerised / digital machines have a programmable size buttonhole - refer to user manual.
However if this buttonhole isn't available to you; there is an alternative method:
Mark out the buttonhole length as normal and attach the clear view foot. Select a regular style buttonhole. Position your fabric under the foot as you would for a normal 1-step buttonhole. Next, pull down the buttonhole lever until you feel it stop. Now start sewing making sure to stop sewing at the stop line. Next, very gently pull the buttonhole lever towards you (once) then start sewing until you are back at the start line. Now very gently push the buttonhole lever away from you (once) and then start sewing until the machine automatically stops.
Corded buttonholes.
As well as having a neater appearance; buttonholes reinforced with a cord are more durable. They have added strength when used on coats and jackets and will maintain their shape when used on stretch and delicate fabrics. It's well worth that little bit of extra effort!
Handy Tip! Make your own buttonhole cord
This way, you'll have an exact colour match to thread you are using to sew the buttonholes.
Draw off approximately ten strands of thread about a foot in length. Then hold the thread tight between both hands. Now twist both ends in opposite directions until the cord is formed. If you've twisted the thread enough times, it should keep its form. Drawing the cord through beeswax will also help.
Four step machines: corded buttonhole
For best results, you'll need the sliding buttonhole foot.

The sliding foot will have pegs at the rear and front. These hold the cord in place as the buttonhole is being sewn out.
If you have difficulty keeping the cord in place around the pegs on the foot, stick it down with a small piece masking tape.
Procedure is then exactly the same as sewing the normal 4 stage buttonhole. However you will need to check that the needle sews over the cord and not through it.
Also, you can afford to have the stitch density slightly more open if preferred.
When you've completed the buttonhole, take hold of the two lose ends of cord and gently pull so that loop of cord at the buttonhole top sinks into the bartack.
One-Step machines: corded buttonhole

The special One-step foot has pegs at the rear and front. These hold the cord in place as the buttonhole is being sewn out.
If you have difficulty keeping the cord in place around the pegs on the foot, stick it down with a small piece masking tape.
Procedure is then exactly the same as sewing the normal 1- step buttonhole. However corded buttonholes work best on the regular style. You can try the keyhole or rounded end (if your machine has them) but you may find this tricky first time round.
You can afford to have the stitch density slightly more open if preferred.
When you've completed the buttonhole, take hold of the two lose ends of cord and gently pull so that loop of cord at the buttonhole top sinks into the bartack.
Manual (turn round) buttonhole.
This type can be produced on machines that are very basic where you only have straight and zigzag stitches.
Please note however; even though you may have a 4-step or 1-step system; you could find this really useful as this method is ideal for making buttonholes on awkward to reach parts of a garment where you may have difficulty positioning the fabric under the foot, or if you need to make a 1-step buttonhole, but due to the size, are unable to place the button into the foot.
Ideally, best results will be achieved with a clear view foot, though not essential.
Mark out your buttonhole size in the normal way.
Position the fabric under the foot making sure the centre line is central to the foot and start line is directly below the needle as shown above.
Select a normal zigzag stitch and set the stitch width to just below 2. If your machine has a needle position control, set this to the left position.
Set the stitch length to 0.5.
1: Sewing the first side
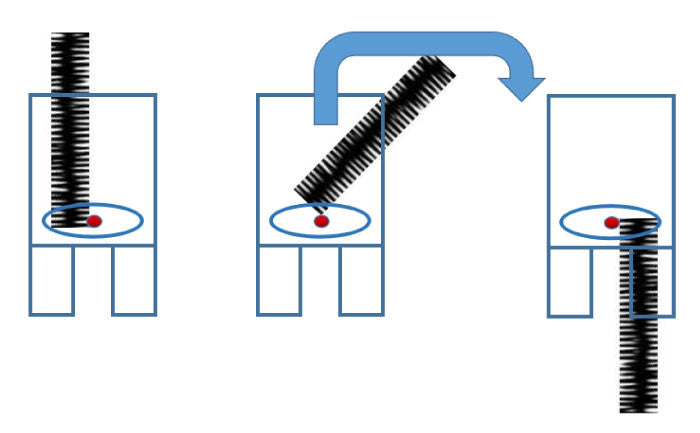
Start sewing maintaining a steady speed, keeping the centre marking line central to the foot. Stop sewing when the stop line appears directly below the needle. Now lower the needle into the fabric so that it rests in the centre of the foot.(as in left diagram below) now pivot the work through 180 degrees (middle diagram) so the stitching has now moved over to the right side of the foot (right diagram)
2: Sewing the first bartack.
Next, set the stitch width to around 4 and sew about five stitches.
3: Sewing the second side
Next set the stitch width back to just below 2 and start sewing maintaining a steady speed until the start line is directly below the needle, then stop.
4: Sewing the second bartack.
Next, set the stitch width to around 4 and sew about five stitches.
5: Tying off
Finally, set the stitch width to 0 and sew just a few stitches to tie off the threads.
Cutting the Buttonhole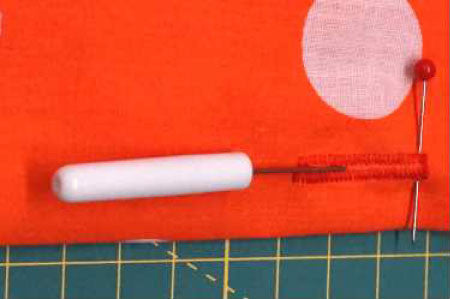
The popular method is to use a seam ripper.
Turn the fabric so that it's underside up. As the gap between the sides is usually slightly wider on the underneath of the buttonhole, you're less likely to nick the stitches.
Push a pin across one end of the buttonhole, just to the inside of the bartack. The pin will prevent the seam ripper from over running and cutting the bartack stitches.
Now insert the seam ripper point into the fabric (just to the inside of the bartack) and pull the fabric into the seam ripper blade, stopping when you reach the pin.
If you've made a keyhole buttonhole, use a small eyelet punch to cut the eye, then use the seam ripper to cut the inside of the buttonhole as above.